Pages

Showing posts with label Canon PowerShot S3 IS. Show all posts

21 May, 2014

Chocolate chip cookies.


These delectable treats were made with molasses and browned butter.

Recipe adapted from Take A Megabite.

My cookies looked nothing like hers. Her cookies can spread out thinly and evenly, while I tried forming dough balls and all I got were thick cookies that heaped in the centre.

I thought melting the butter was supposed to make them spread magically before they cook, but okay.

So I got fed up and shape them in flat rounds instead. If you made them as I did, you get about 4 dozen of cookies from this recipe!

I also greatly reduced the amount of sugar, from a heaping 330 g granulated + brown sugars, I used only 110 g. But I dare assure you, this is sweet enough.

04 January, 2012

Lasagna with Tomato and White Sauce + Very Malaysian Risotto.

Lasagna with Tomato and White Sauce


On new year's eve, I had these instant lasagna sheets left in my fridge so I've got to make him his last homemade lasagna of the year.

Anyways, my faith in making my own tomato sauce had reduced until I decided to take up kitchenknifegang's advice. I used to cook the blended tomatoes at one go which resulted in a greater time taken to boil, this time I reduced the juices in batches.

Tomato sauce:
500g ripe tomatoes, peeled and blended (I reckon it's better to use cherry tomatoes, my sibling did once and the taste was fantastic)
1 small red onion, chopped
200g pork, minced
Italian mixed herbs
Pepper

1. Heat oil in pan. Cook onion, then sauté minced pork until thoroughly cooked.
2. Pour in quarter of the blended tomatoes, let it simmer cooking over medium heat, stirring constantly.
3. When the juices have reduced to one-third, add in the next batch of blended tomatoes. Repeat until all used up.
4. Flavour with herbs and pepper.


Improvise?
Yes definitely. Decent tomato paste SHOULD be used. The flavour of this sauce was still too bland as a pasta sauce, eventhough it was dry enough.

White sauce:
1 cup milk
1 tbsp butter
1 tbsp flour

1. Melt butter in pan. Add in flour and stir to incorporate.
2. Pour in milk and stir over medium heat until thickens to your preferred consistency. This could take a while.

Also added were mixed herbs.

We also cooked the instant lasagna sheets for a moment in water, so that they would not take too much time to turn tender when in the oven, like before. When assembling with a good 200g of shredded mozzarella:


After 20 minutes at 180°C.


Very Malaysian Risotto


To be honest, I've been reminiscing about risotto that's been transformed by my ex, and even more after the post I've mentioned: Simple Parmesan Baked Risotto.

The reason this risotto is very Malaysian is that instead of the typical risotto rice like Arborio, I used locally produced rice. I was going to try the dish with Japanese rice but he couldn't find it in his kitchen, and it would be such a waste for me to buy a 500g packet for the 10g of rice I was gonna use.

Besides, I'd also used Chinese rice wine. I originally went for Shao Xing but it again, could not be found.


What I did:
500ml vegetable stock (cooked with these seasoning granules)
1/3 cup rice, uncooked
150g pork, minced
2 Shiitake mushrooms, soaked and sliced
1 tsp rice wine
Formaggio (I mistaken this as canned Parmesan)

1. Melt butter in pan. Sauté pork until cooked.
2. Pour in two ladles of stock and all the rice. Stirring constantly, simmer until stock reduces by two-third.
3. Stir in the wine along with another two ladles of stock, again, reduce until one-third is left.
4. Repeat by adding two ladles of stock at a time, simmering until rice is tender enough.
5. Then, add in Shiitake mushrooms while cooking the last batch of stock.
6. When the rice is moist enough (don't dry it up too much), turn the heat off. Pour cheese enough to cover the rice, and mix thoroughly. Serve.

Improvise?
The pork should not be cooked before the rice and stock are in the pan, as it loses flavour and becomes plain and dry after the dish is done like it does in soup. I was cooking only for myself, so the pork was still alright.

21 December, 2011

Continuation.

I'm weeks late for this post! Gave both Tomato, Corn & Chilli Soup and Chilli Prawn & Noodle Salad a try the next day after this, satisfied with the first, not a fan of the latter. Needs more flavouring, I'm not used to eating noodles tossed with plain lime juice.


Tomato, Corn & Chilli Soup:
Oil, enough
300g chicken breast, sliced
1 medium red onion, chopped
1 tbsp flour
1.5 litres stock (I prepped this using the vegetarian granules)
Juice from 700g tomatoes (for this, I peeled and blended the tomatoes)
Kernels of 1-2 corns
1 red chilli, deseeded and chopped
Coriander leaves

1. Heat enough oil in a pan, cook chicken thoroughly. Shred chicken when cool.
2. Heat separate oil in pan, cook onion. Pour in stock and tomato juice, cook until mixture boils. *Stir in flour. Let it simmer until slightly thickened.
3. Add chicken, corn and chilli. Stir until fragrant.
4. Serve with coriander leaves.
*Flour was supposed to be added in after the onion dices were cooked, but I missed that out again until after the stock was in.


Chilli Prawn & Noodle Salad:
6 medium cooked prawns
1/4 cup lime juice
1 red chilli
2 tsps sugar
200g glass noodles
C0riander leaves (mint leaves are suggested by the recipe)
Note: 2 tbsps sweet chilli sauce is also suggested by the recipe, but I think it wouldn't fit? Comment below.

1. Devein prawns and steam until just cooked. Shell prawns.
2. Mix prawns with juice, chillies and sugar.
3. Add noodles into a pot of boiling water, cook until tender. Drain and filter with room temp. water.
4. Combine noodles with prawns mixture. Serve with coriander leaves.

10 October, 2011

The little things of happiness.


Having finished the button mushrooms, this time I used shiitake - my all-time-favourite fragrant mushrooms - to make an Omelette. Haven't been eating one for long, I can take on one serving and that alone can be my dinner.

I referred to Epicurious because I don't like the addition of milk in savoury egg dishes.

The filling contained: one shiitake mushroom and a quarter of red onion, sautéed, seasoned. Two eggs were used. And due to some rumour my mom forbids me from adding the salt in the eggs prior to cooking, thus I used soy sauce instead. Garnished with a dash of Italian herbs.

Oh, my folding failed! xD

05 October, 2011

My kind of breakfast.


This recipe was adapted from Jan '10 issue of Food & Travel.

It originally calls for carrot, orange rind and juice, but grating is a hard labour and we still have lots of passion fruit stocked up from Bukit Tinggi.

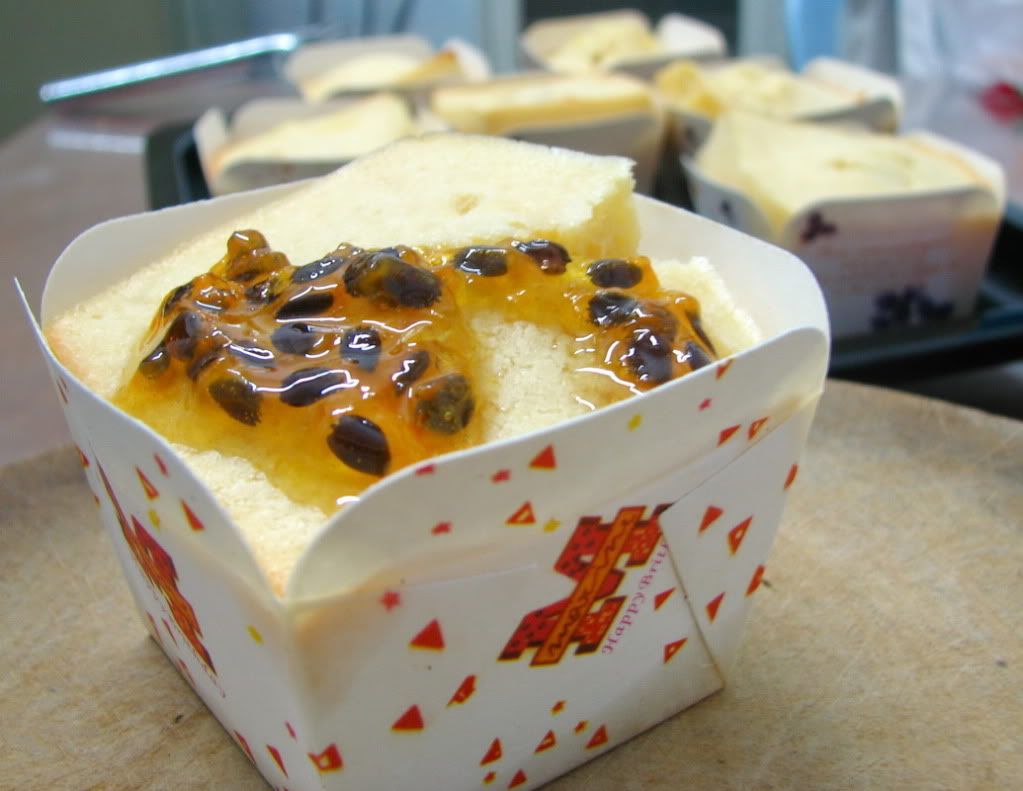
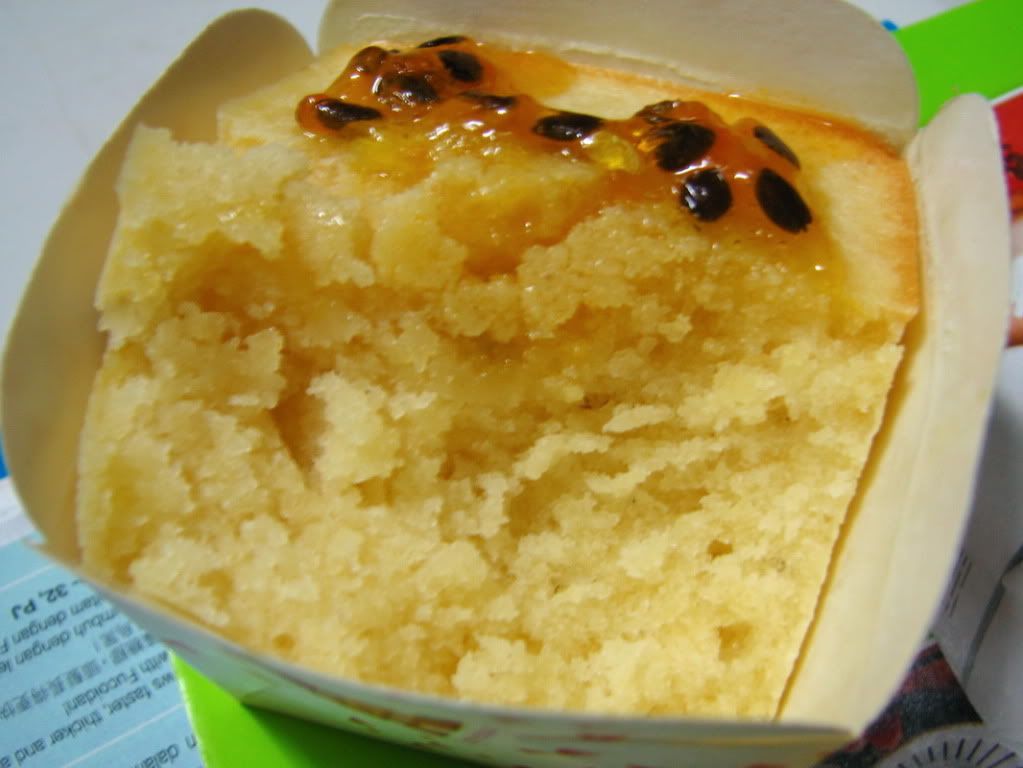
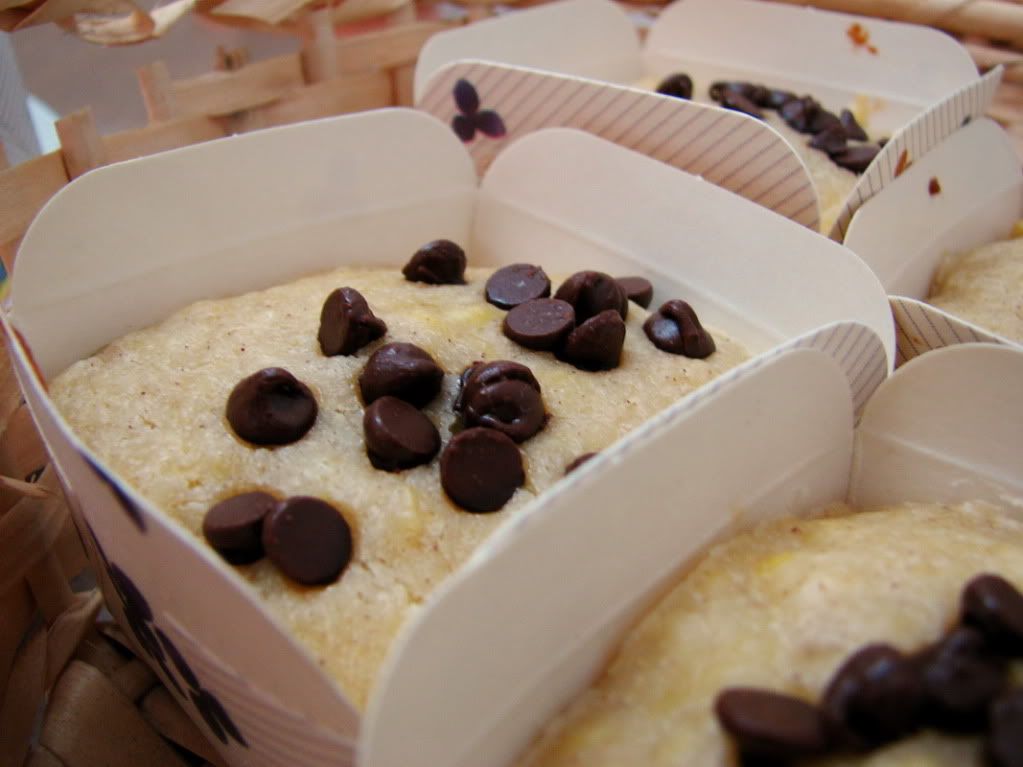
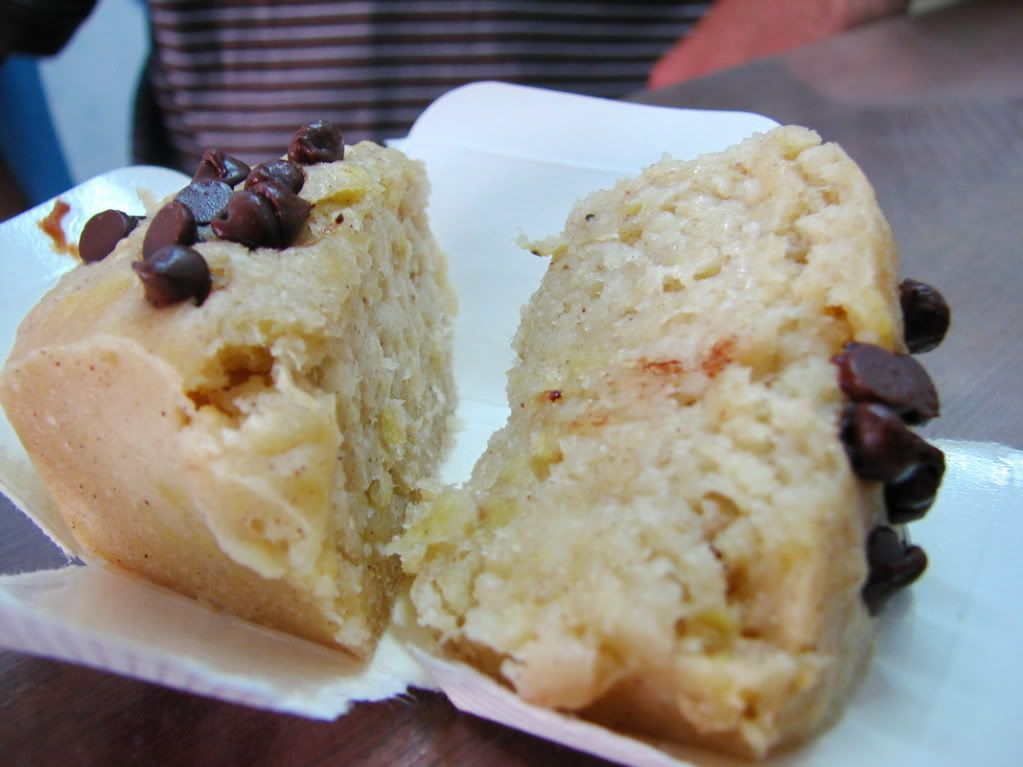
Anyway, the muffins are absolutely heart warming! Get infected with one bite off a freshly baked Passion Fruit Muffin using this recipe. This has got to be my favourite muffin recipe. It's really easy to follow. If you like light milky flavour then you can omit the fruit syrup from this recipe.

If you have a glucose-conscious family member, just make a small portion of the syrup to flavour the muffins.

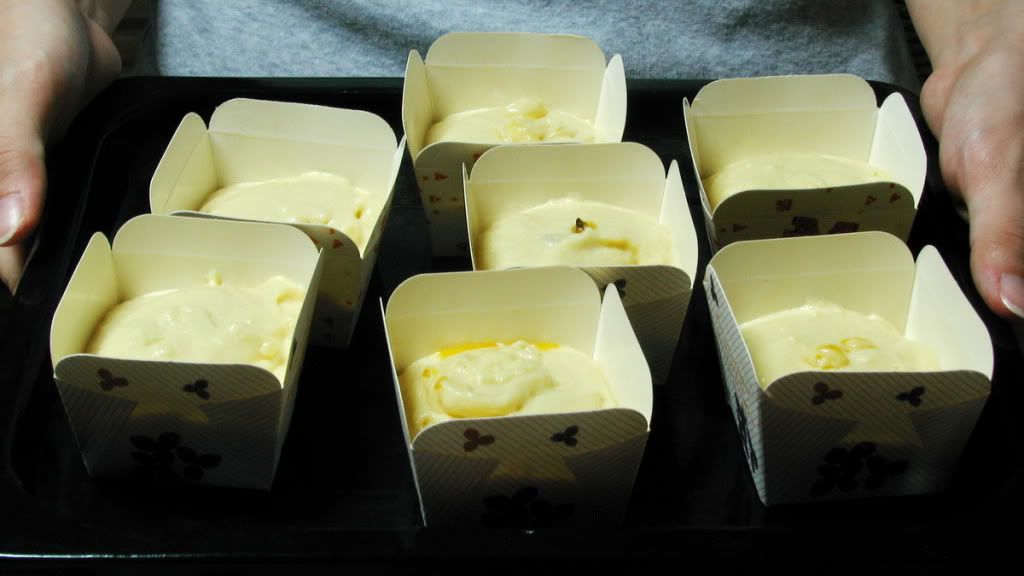
I used a measuring cup instead of converting the measurements to metric form. Got myself 7 petite muffins using half of the recipe.

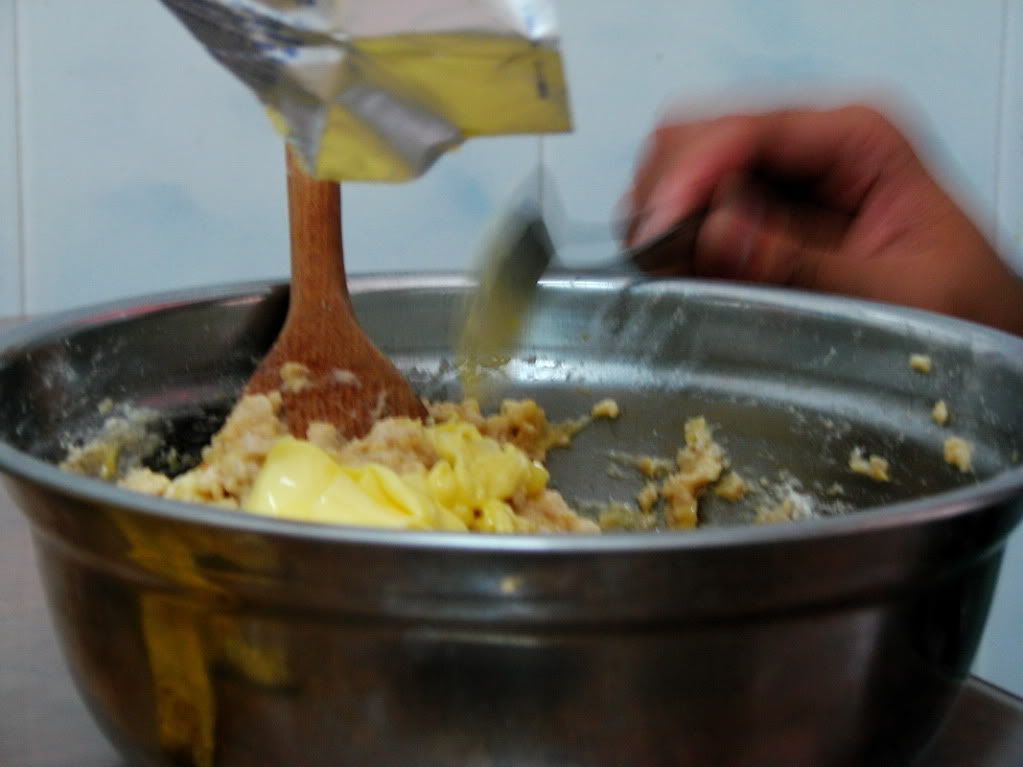
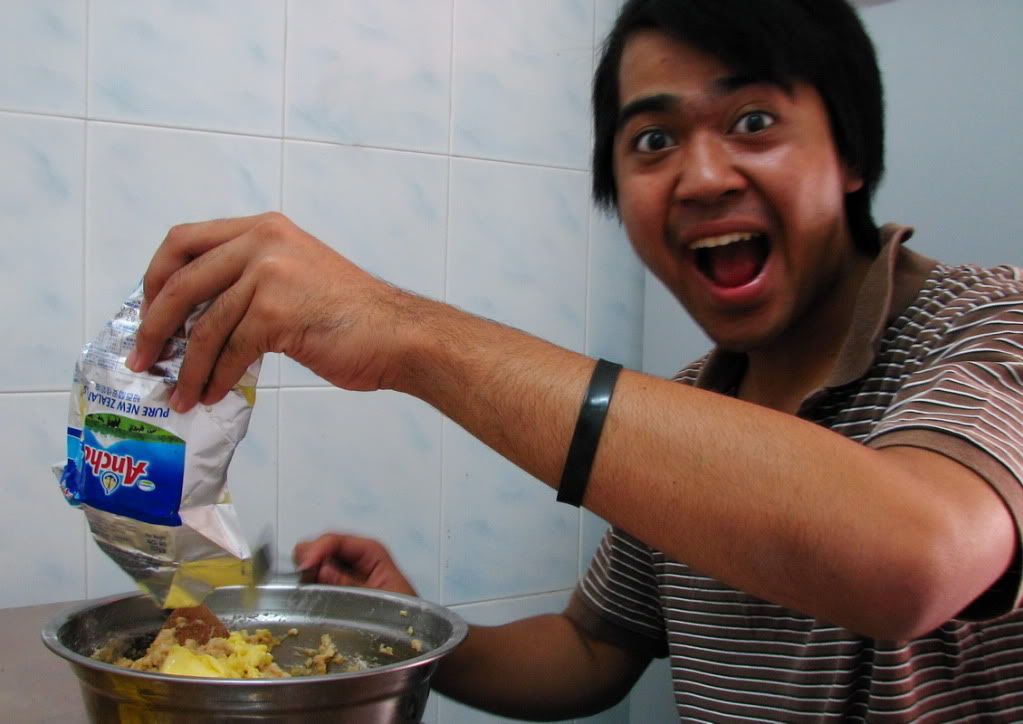
125g butter (I used fat spread)
1/3 cup sugar
2 eggs
1 1/2 cups self-raising flour
1/3 cup milk

Passion fruit syrup
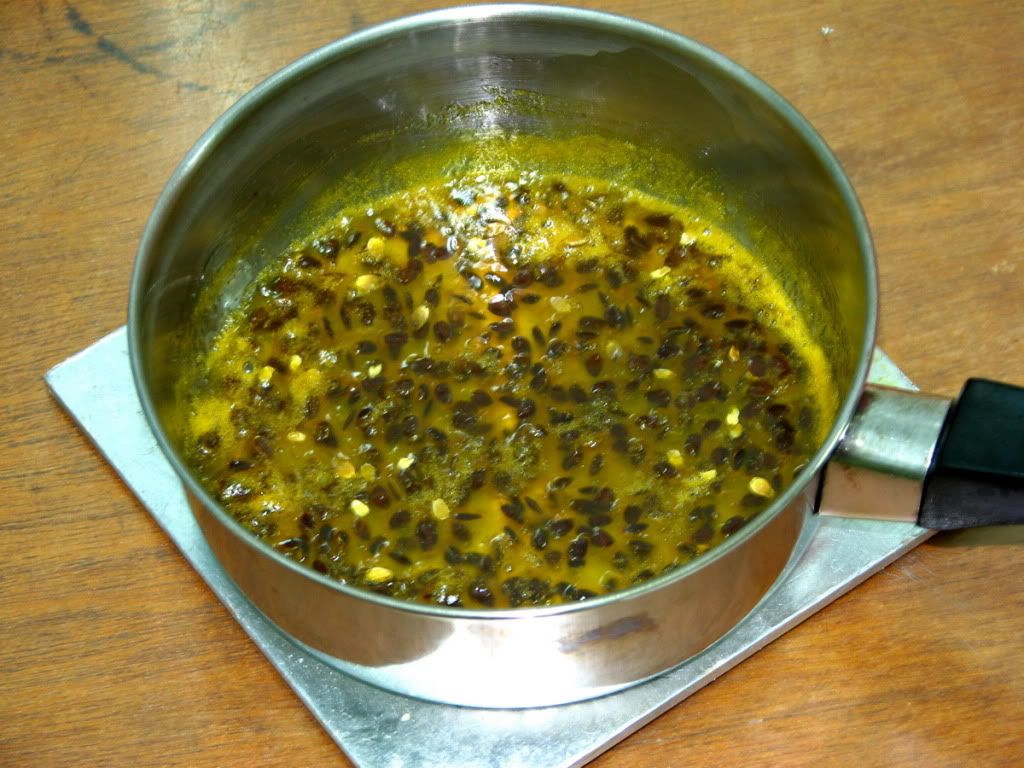
Juice of 3 passion fruits
Caster sugar (measure it in the same container as the juice, have the sugar to make up half the volume of juice would do)
*Juice to sugar ratio is 2:1, e.g. 1 cup juice to 1/2 cup sugar.

1. Preheat oven to 180°C.
2. For the syrup: Heat the juice and sugar together, stirring constantly until the sugar melts. Turn the heat down and simmer until the liquid begins to thicken just a little, about 15 minutes. Remove from heat, it will thicken when cooled.


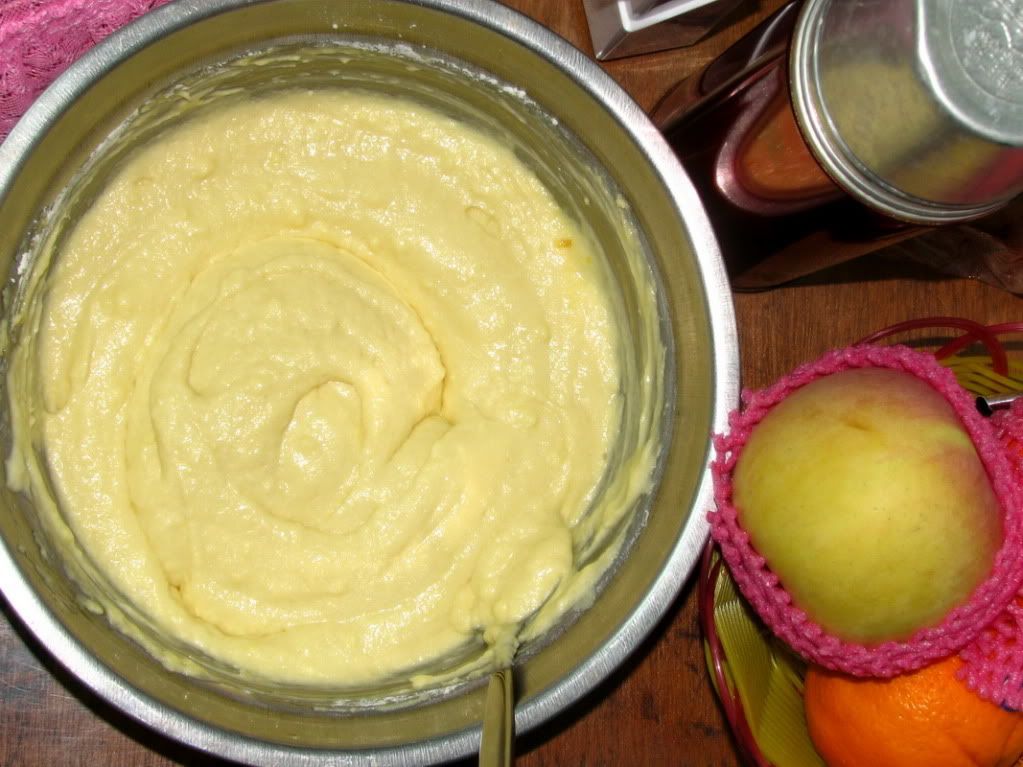
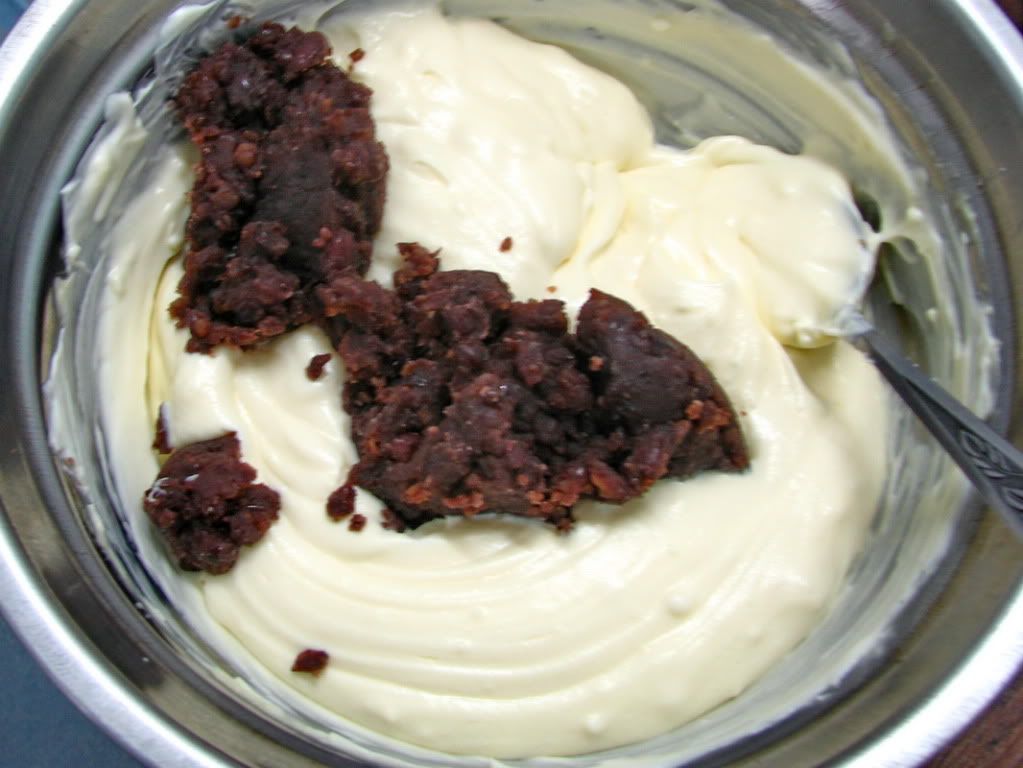
3. Beat butter and sugar until well combined. Crack the eggs one by one into the mixture, mixing before adding the next egg.
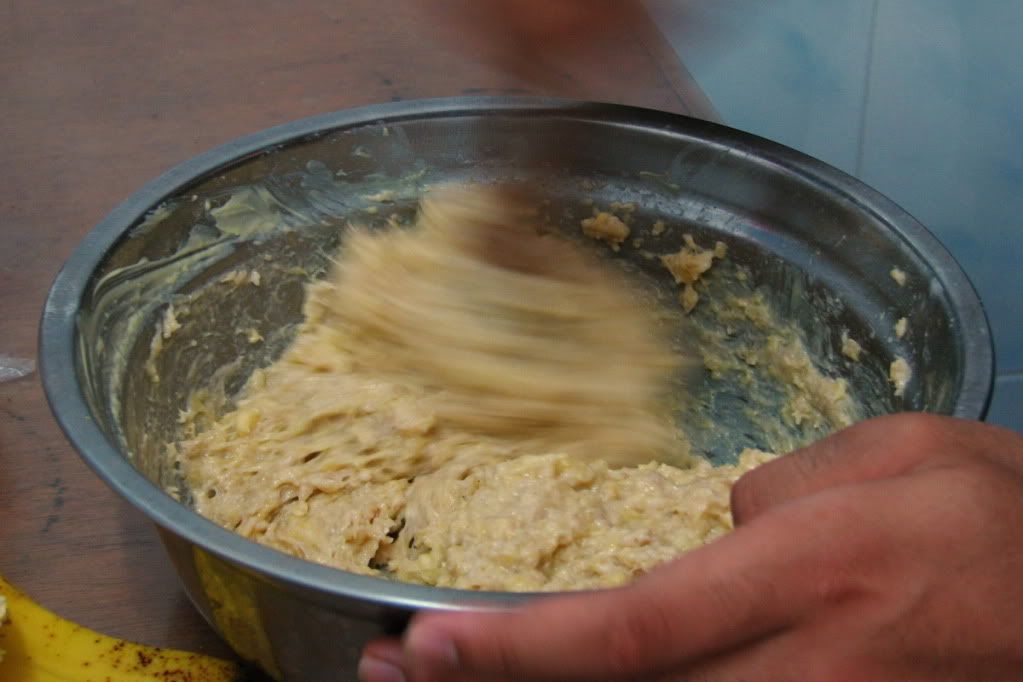
4. Then, fold in flour and milk alternatively in batches. (I didn't realize why until I did so, the mixture immediately became sticky you have to pour in the milk to smooth it back for the next batch of flour.)


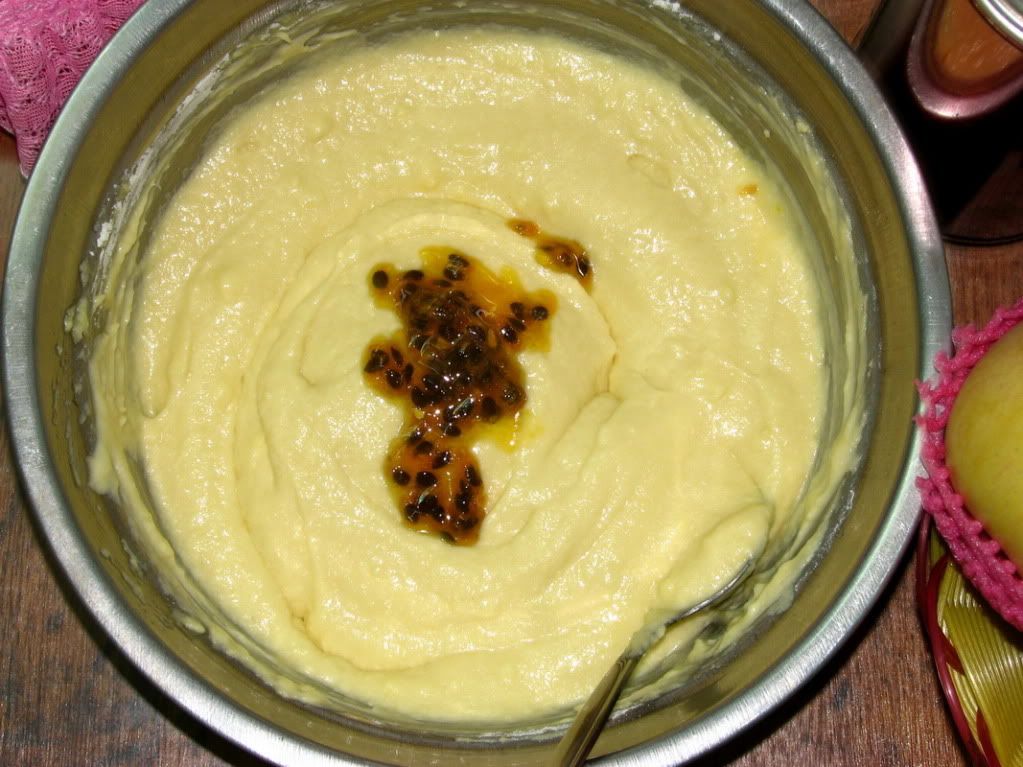
5. Add a few teaspoons of the syrup into the batter. Sieve it if you don't fancy the seeds. Mix well.


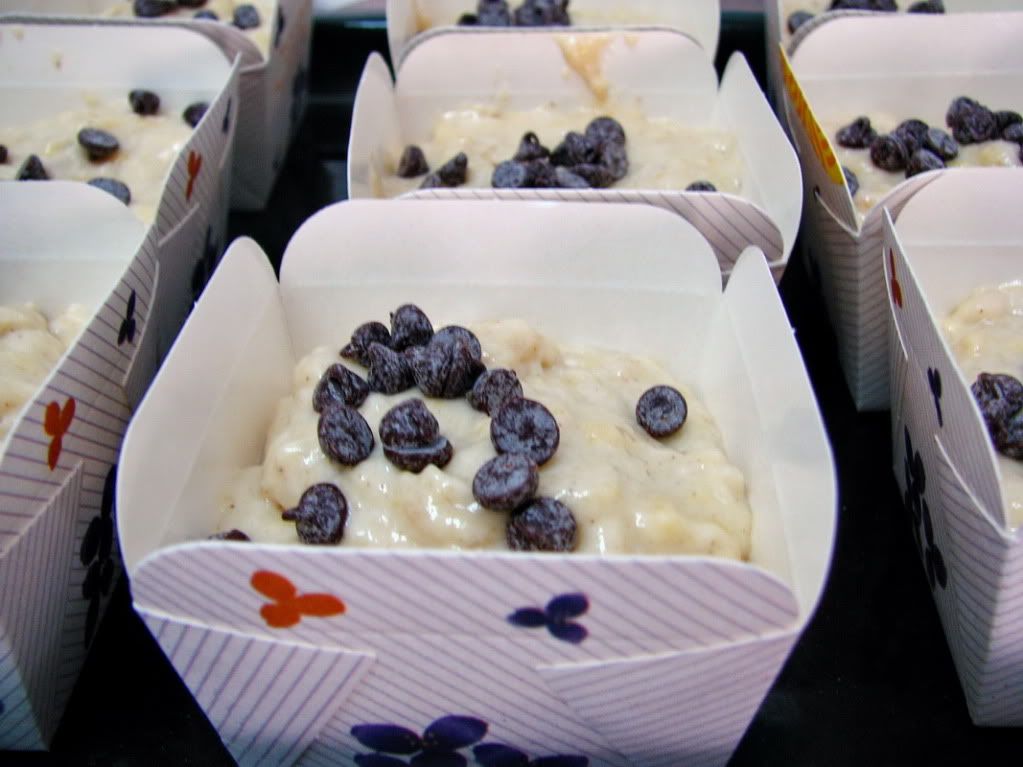
6. Divide into cases.  Bake for 25 minutes or until cooked.


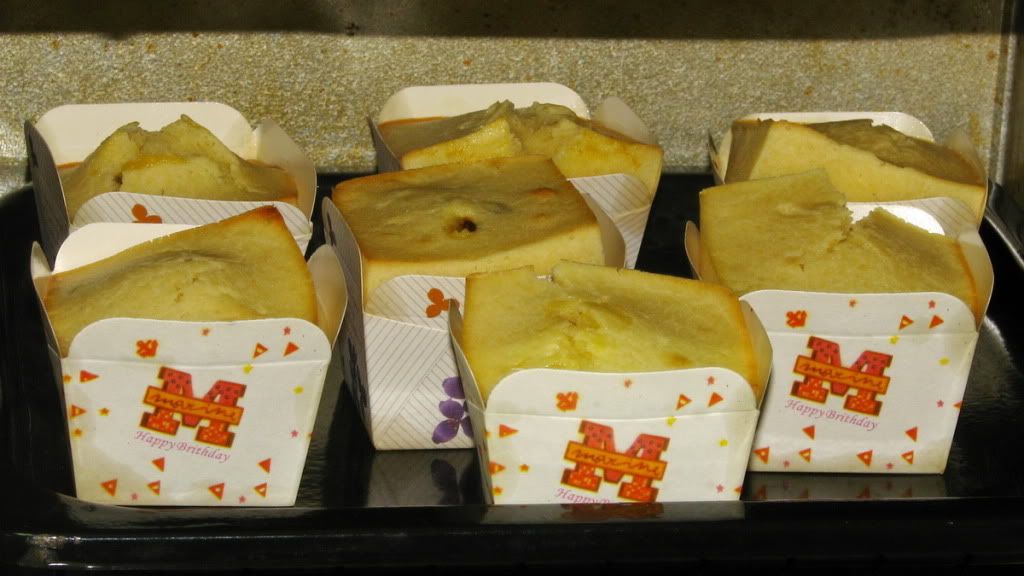
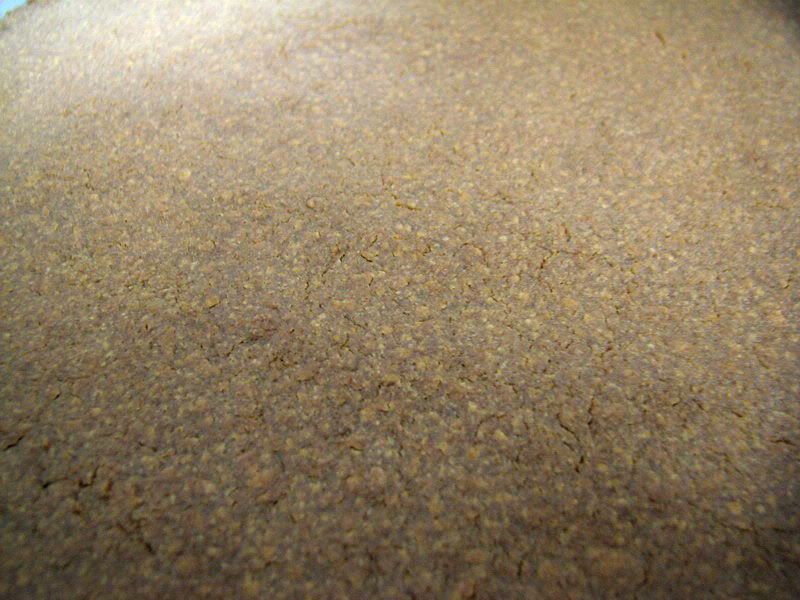
The muffins raised rather funnily, right? I didn't switch their places in intervals. And cracks!

Still a little airy, certainly not as firm-packed as the other muffins in older posts.


- Adapted from Food & Travel magazine,
Key Editions Pte Ltd,
Jan 2010 issue

30 September, 2011

No-bake red bean cheesecake.

I've been craving to make foods after I quit working. My university life is starting next month (tomorrow is the beginning of October, I gotta embrace it!) and it's been a long time since I had the time to cook or bake.

I found the recipe from my brother's bundle. Credit can be located at the bottom of the post.


This I could say, is one of my most successful cakes, maybe I was less slouchy and the method was not so tedious. The produce was rather delicate. *smiles* But sadly there were gelatin lumps that weren't incorporated into the cheese mixture.

It's a chilled cake and no egg is needed.

Firing away.

For the biscuit base:
I used the square crackers the seniors love dipping into coffee, and a tablespoon of melted butter. Only this time, I chilled it in a baking pan with removable base, instead of baking it.

For the red bean filling you'll need:
100g red beans, cooked until soft in water (but still a lil' stiff for my case, anywho, as long as it's edible)
60g caster sugar

1. Strain water from red beans, and process the red beans until they form a paste.
2. Cook the paste over medium heat. More water would ooze out after some time. Cook until there's less liquid, but still a little moist.
3. Add in the sugar and cook until it dissolves.

The final product.

For the cake:
250g cream cheese
50g caster sugar
1 1/2tbsps gelatin powder
60g water
250g whipping cream (I used the 250ml pack, it weighed a little over 200g, and the original recipe calls for 300g)
200g red bean filling (I had a little over 200g from the recipe, the leftover is still in the fridge *guilty*)

1. Combine gelatin powder and water in a bowl, over a bain-marie, cook until gelatin dissolves.
2. While waiting for (1), beat cream cheese and sugar until incorporated.
3. Pour (1) over the cheese mixture and stir well. (Lumps in my cake were formed in this process.)

I was curious about how mixing gelatin mixture with cream cheese would turn out.

4. Beat the whipping cream until soft peaks form, then fold into the cheese mixture.

I LOVED this! It was so fluffy!

5. Mix in 200g red bean filling.


6. Pour mixture into the baking pan with biscuit base.
7. Refrigerate for 4 hours or more.

Highly recommended for bakers! I've tried some recipes since year 2005 and except for the Cottage Cheesecake, the rest turned out really good.

06 August, 2011

Passion fruit cheesecake.

Few days ago I spent a little time making a Passion Fruit Cheesecake.  This one is super easy.


500g cream cheese
100g caster sugar
Pulp from 3 passion fruit
200g non-dairy whipping cream, whipped till soft peaks formed
1½ tbsp gelatin powder melted in 4 tbsp water by double boiling

1. Combine cream cheese and sugar. Add in pulp, stir well.
2. Mix gelatin solution into the whipping cream. Then stir together with the cheese (the recipe says to add by batches but I didn't notice that, oops).
3. Store in the refrigerator overnight.

Recipe by Alan Kok.

His version comes with a biscuit base (which I FORGOT until I finished the cake part). It's so limp without the base as support.

07 May, 2011

Mother's Day: very dry banana yogurt muffins.


Remake of my favourite recipe from Lebovitz (not that I tried anything else he'd shared), but this time in muffin cups with a dash of imported chocolate chips sold at a newly opened local cake supply plus help from a best friend of mine featured here.


I love these square muffin cups! I used to have those flimsy paper cups that were not waxed on the inside, had to use two layers back then to make brownies.

After that...


The muffins were quite moist, which I liked. But his mom told him that the cakes would have shorter shelf live because of that and they should be baked longer, as I altered the actual baking time for a tinned cake to a short 25 to 30 minutes.  Once they looked dry from the surface I would retrieve them from the oven.

There were no pretty cracks by the way. I only used baking powder for this, but baking soda was already out of stock since a long time ago.

The tester looked like this...


I also followed the mom's advice to bake it (which kinda disrupts the process of baking since they were already cool) but all I got was a drier surface, and nothing brownish. :(

But anyways, our effort was there. It was also his first time to bake a cake.

Happy mother's day in advance!

03 February, 2011

Happy Lunar New Year!


Here's a lemon meringue pie for all of you. :)
(I know the pastry doesn't look well-presented >.<)

01 February, 2011

White chocolate marble cheesecake from Flavours magazine.

Still fumbling thru folders for a better picture, don't mind my old watermark.

Becoming the victim of this recipe has its price to pay.  Instead of using dark (in appearance, that is) chocolate, it calls for coffee solution, and I was never fond of it.


White Chocolate Marble Cheesecake
Biscuit base
Cookies, crushed (enough to cover the bottom of a pan)
Butter, adequate (enough for the bits of cookies to stick together firmly)

Melt butter and mix with the crushed cookies.  Press it against the bottom of the cake pan with the back of a spoon and bake under 180°C for 10 minutes.

Before and after baking.

Dark chocolate mixture
12g cocoa powder
2 teaspoons instant coffee powder (I used a packet of 3-in-1)
30ml hot water

Combine all ingredients and mix until smooth.  Set aside.

White chocolate mixture
750g cream cheese (this has got to be the most expensive part)
120g castor sugar
8g cornflour
3 eggs, lightly beaten
100g white chocolate (again, I usually choose cheap local made chocolates)
300ml yoghurt

Beat cream cheese until smooth.  Add sugar and cornflour, mix.  Gradually mix in eggs, white chocolate and yoghurt.  Set aside 150g of the mixture.


To prepare
To the remaining mixture, add the dark chocolate mixture; mix well.  Pour half the white mixture onto the baked biscuit base.  Dot half the dark mixture in the white mixture.  Swirl with a bamboo stick (I use the narrow end of a fork) to create a marbling effect.  Repeat with the remaining white and dark mixtures.

To bake
Preheat oven to 150°C.  Bake in the oven, bain-marie, for 80 minutes, or until the cake is set - the centre should still be slightly soft.  Turn off the heat and let the cake cool in the oven, with door closed, for 30 minutes.  Run a knife along the edge to loosen the cake, then set it back in the oven to cool completely with the door ajar.

- Adapted from Flavours magazine,
recipe contributed by Catherine Lau,
Nov/Dec 2009 issue

18 December, 2010

The scent of chocolate.


Homemade Toll House cookies.

It was intended to be big. Not just big, it's big big. But we failed in the consistency of size.

Recipe adapted from AllRecipes.com, adjusted to lessen sweetness.
    Our version was:
    225 g butter
    Half a cup white sugar
    2 medium eggs
    A hint of vanilla extract
    250 g all-purpose flour (more was added for desired texture)
    55 g MILO powder
    1 teaspoon baking soda
    Half a teaspoon cream of tartar
    100 g each semisweet & milk chocolate, roughly chopped
    Chopped hazelnuts
    Crushed almond flakes

    Cookies were baked in 5 batches, 20 minutes for each under 180 degree Celcius. :)

    Much loved and frequently grabbed was the cookie dough, a popularly commercialised ice cream flavour.


    And the next picture shows you the overall presentation of a randomly picked cookie.


    The sweetness was perfectly tolerable, even to elders. (Cup used to measure sugar was a 300 ml size.)

    By the way, MILO is a great substitution to cocoa powder. Bonus? Less bitterness. ;)